手把手教你使用YOLOV5训练自己的数据集并用TensorRT加速 |
您所在的位置:网站首页 › yolov5 3090加速 › 手把手教你使用YOLOV5训练自己的数据集并用TensorRT加速 |
手把手教你使用YOLOV5训练自己的数据集并用TensorRT加速
|
点击上方“3D视觉工坊”,选择“星标” 干货第一时间送达
本文主要介绍目标检测YOLOV5算法来训练自己的数据集,并且使用TensorRT来对训练好的模型进行加速推理。 环境配置ubuntu 18.04 64bit nvidia gtx 2080Ti cuda 11.0 torch 1.7 pip install requirements.txt (手动狗头) 我用的是nvidia官方的docker镜像,下载下来直接就可以用。镜像地址:https://hub.docker.com/r/ultralytics/yolov5 训练COCO我们下载的预训练模型就是使用COCO数据集训练出来的模型。下载COCO,运行下面的命令。YOLOv5s/m/l/x的训练时间在单台V100上是2/4/6/8天(多GPU时间更快)。使用你的GPU允许的最大的--batch-size(16 GB设备的batch大小显示)。 $ python train.py --data coco.yaml --cfg yolov5s.yaml --weights '' --batch-size 64 yolov5m 40 yolov5l 24 yolov5x 16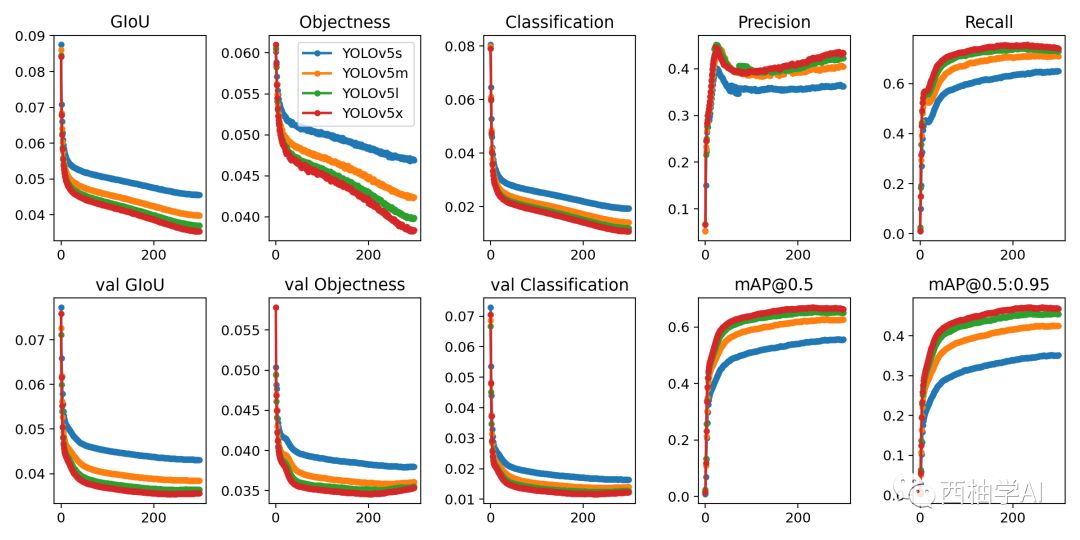
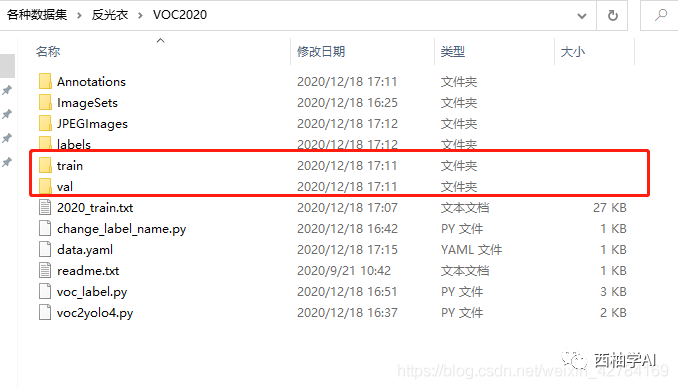
COCO的数据集可以通过data文件夹下get_coco2017.sh脚本进行下载,包含图片和lable文件。整个数据集的压缩包有18G。 训练自己的数据集首先是收集数据,可以找开源数据集,也可以自己爬虫。我训练的是反光衣模型,用的是磊哥开源的数据(反光衣数据地址:https://github.com/gengyanlei/reflective-clothes-detect)。这个数据集用的labelimg标注的voc格式的数据,需要转换成yolo格式的数据(class x_center y_center width height)。labelImg支持YOLO和PascalVOC 2种格式,前者标签信息是存储在txt文件中,而后者是存储在xml中。 整个数据集以下列格式组织,其中train和val是用来训练和验证的数据集。
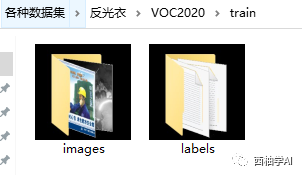
其中train文件夹
labels文件夹下的yolo格式文件  在这里插入图片描述
labels文件下的txt文件和images下面的jpg文件是一一对应的。简单解释一下txt格式的意思。 格式为:class_id class x_center y_center width height txt文件中一行表示一个bbox,也就是一个对象。class_id 为类别id,计数从0开始到(classes-1),我现在用的反光衣数据集有两类分别为 reflective_clothes、other_clothes,该txt的class_id 为1,表示images下000000.jpg这张照片有一个bbox,bbox的类别为other_clothes。 后面x_center y_center width height参照图片宽度和高度的相对比例(浮点数值),从0.0到1.0。 注意:x_center y_center 表示的是矩形的中心,而不是左上角的位置。 其中的voc_label.py脚本的作用是将voc格式的xml文件转成上面yolo格式需要的txt文件。附上代码。 #该脚本的作用是将xml格式的文件转换成yolo需要的格式 import xml.etree.ElementTree as ET import pickle import os from collections import OrderedDict from os import listdir, getcwd from os.path import join ''' fire-detect: VOC2020 to yolo format code ''' sets = [('2020', 'train')] classes = ['reflective_clothes', 'other_clothes'] # VOC2020 folder root #data_root = r'/home/fire_data/' # voc的训练txt 验证txt 必须在VOC*** 以及目录下 不能在Main目录下面;它是在统计目录下 def convert(size, box): dw = 1./(size[0]) dh = 1./(size[1]) x = (box[0] + box[1])/2.0 - 1 y = (box[2] + box[3])/2.0 - 1 w = box[1] - box[0] h = box[3] - box[2] x = x*dw w = w*dw y = y*dh h = h*dh return (x,y,w,h) def convert_annotation(year, image_id): global data_root in_file = open('Annotations/%s.xml'%(image_id), encoding='utf-8') out_file = open('labels/%s.txt'%(image_id), 'w') tree=ET.parse(in_file) root = tree.getroot() size = root.find('size') w = int(size.find('width').text) h = int(size.find('height').text) for obj in root.iter('object'): difficult = obj.find('difficult').text cls = obj.find('name').text if cls not in classes: # or int(difficult)==1 不关心difficult continue cls_id = classes.index(cls) xmlbox = obj.find('bndbox') b = (float(xmlbox.find('xmin').text), float(xmlbox.find('xmax').text), float(xmlbox.find('ymin').text), float(xmlbox.find('ymax').text)) bb = convert((w,h), b) out_file.write(str(cls_id) + " " + " ".join([str(a) for a in bb]) + '\n') # wd = getcwd() for year, image_set in sets: # if not os.path.exists(data_root + 'VOC%s/labels/'%(year)): # os.makedirs(data_root + 'VOC%s/labels/'%(year)) image_ids = open('ImageSets/Main/%s.txt'%(image_set)).read().strip().split()#有空格的就不行了 list_file = open('%s_%s.txt'%(year, image_set), 'w') for image_id in image_ids: print(image_id) list_file.write('JPEGImages/%s.jpg\n'%(image_id)) convert_annotation(year, image_id) list_file.close() ''' fire-detect: train.txt test.txt ''' root = r'./JPEGImages/' f = open(r'./2020_train.txt', 'w') names = os.listdir(root) for name in names: print(name) f.write(os.path.join(root, name)+'\n') f.close() # 6:4 -> train.txt test.txt制作好yolo格式的数据集之后,还需要创建一个data.yaml文件,我的data.yaml文件如下: 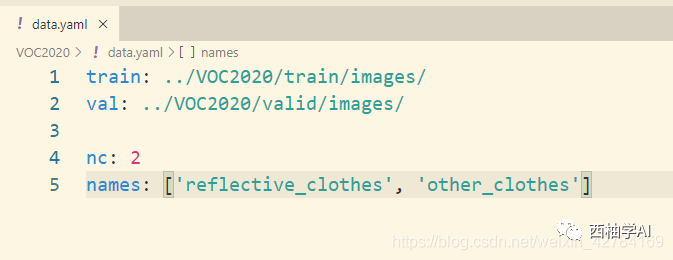 在这里插入图片描述
其中:(1)train,val路径为你的各个集合图像实际路径; (2)nc:数据集的类别数,这里我的数据集反光衣只有两类,为2; (3)names:数据集类别名称。 可以对照我的修改自己的数据集就行了。VOC2020就是我们最后制作好的数据集,需要和yololv5放在同一级目录下。(也不是必须要放在同一级目录下面,其实你看懂我的data.yaml可以自己修改数据集所在路径。)  在这里插入图片描述
最后修改yolov5/models/yolov5s.yaml,将nc = 80修改为nc = 2,因为数据集中只有reflective_clothes和other_clothes2个类别。 训练命令 从预训练模型加载: cd yolov5 python train.py --img 640 --batch 4 --epochs 300 --data ../VOC2020/data.yaml --cfg models/yolov5s.yaml --weights weights/yolov5s.pt从头开始训练: cd yolov5 python train.py --img 640 --batch 4 --epochs 300 --data ../VOC2020/data.yaml --cfg models/yolov5s.yaml --weights ""在2080ti上面大概2k张数据训练了4个小时左右。训练结束后,可以在runs/exp1/weights文件夹下面可以找下自己数据集的权重文件,有best.pt和last.pt。然后可以用val文件夹下面的照片测试一下效果。附上我训练出来的反光衣模型效果。 运行命令:可以测试自己的数据集效果,得到的照片在inference/output文件下。 python detect.py --source ../VOC2020/val/images/workers__112.jpg --weights runs/exp/weights/best.ptdetect.py也对各种图像来源进行推理: python detect.py --source 0 # webcam file.jpg # image file.mp4 # video path/ # directory path/*.jpg # glob 'https://youtu.be/NUsoVlDFqZg' # YouTube video 'rtsp://example.com/media.mp4' # RTSP, RTMP, HTTP stream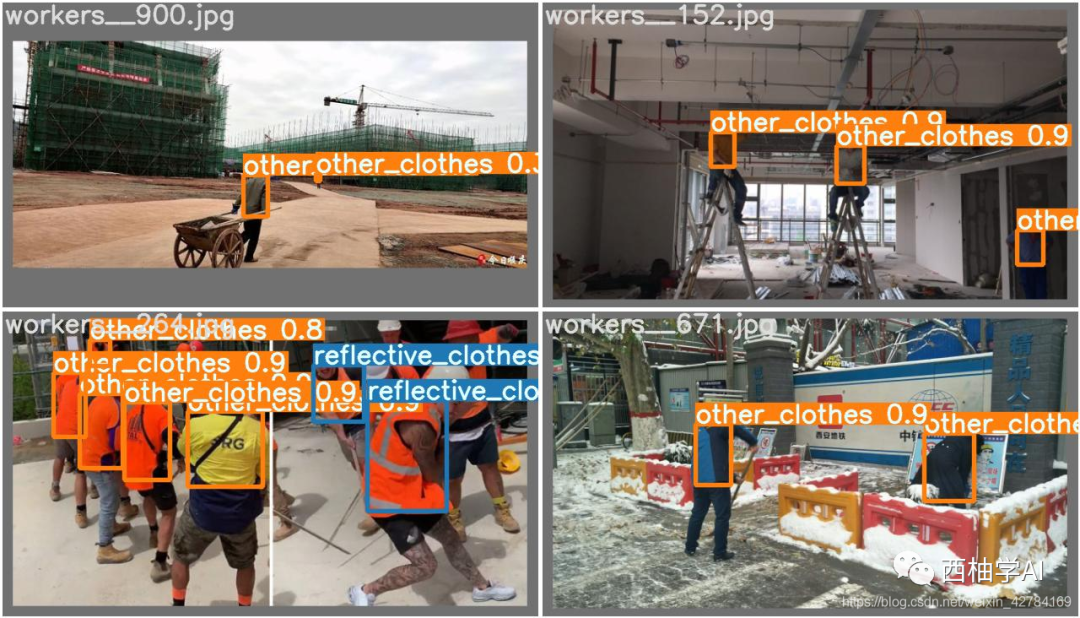 反光衣检测结果
至此,使用yolov5训练自己的数据集就完成了。 使用TensorRT对模型进行加速推荐大佬的Repo:https://github.com/wang-xinyu/tensorrtx/tree/master/yolov5 这个repo里面常用的CNN分类网络,目标检测,人脸识别都有对应的实现。作者用TensorRT api重写了网络结构,想直接上手,请看下面步骤。 环境要求:GTX1080 / Ubuntu16.04 / cuda10.0 / cudnn7.6.5 / tensorrt7.0.0 / nvinfer7.0.0 / opencv3.3 下面介绍怎么使用该repo对模型进行加速。 config 注意:配置文件一定要先修改,具体怎么改,看自己训练时候的参数,改成对应一致的就ok了 Choose the model s/m/l/x by NET macro in yolov5.cpp Input shape defined in yololayer.h Number of classes defined in yololayer.h, DO NOT FORGET TO ADAPT THIS, If using your own model INT8/FP16/FP32 can be selected by the macro in yolov5.cpp, INT8 need more steps, pls follow How to Run first and then go the INT8 Quantization below GPU id can be selected by the macro in yolov5.cpp NMS thresh in yolov5.cpp BBox confidence thresh in yolov5.cpp Batch size in yolov5.cpp 1. generate yolov5s.wts from pytorch with yolov5s.pt, or download .wts from model zoo //生成.wts文件 //git clone https://github.com/wang-xinyu/tensorrtx.git //git clone https://github.com/ultralytics/yolov5.git // download its weights 'yolov5s.pt' //下载与训练模型yolov5s.pt或者用我们自己训练好的best.pt文件 // copy tensorrtx/yolov5/gen_wts.py into ultralytics/yolov5 //把tensorrtx/yolov5/gen_wts.py 这个脚本复制到yolov5文件夹下 // ensure the file name is yolov5s.pt and yolov5s.wts in gen_wts.py //我们的pt文件不一定非要是yolov5s.pt(具体自己也可以修改,在gen_wts.pt中修改,不想修改的就和作者的命名保持一致),运行脚本在训练目录下会生成一个yolov5s.wts文件 // go to ultralytics/yolov5 python gen_wts.py // a file 'yolov5s.wts' will be generated. 2. build tensorrtx/yolov5 and run //build然后运行 // put yolov5s.wts into tensorrtx/yolov5 //把上面生成的yolov5s.wts文件复制到tensorrtx/yolov5下 // go to tensorrtx/yolov5 进入到tensorrtx/yolov5 // ensure the macro NET in yolov5.cpp is s //注意:一定要查看yololayer.h和yolov5.cpp文件,主要修改对应的参数和我们训练时候保持一致,不然会报错 // update CLASS_NUM in yololayer.h if your model is trained on custom dataset //剩下的就没什么好说的了,直接一句句执行就ok了 mkdir build cd build cmake .. make sudo ./yolov5 -s [.wts] [.engine] [s/m/l/x or c gd gw] // serialize model to plan file sudo ./yolov5 -d [.engine] [image folder] // deserialize and run inference, the images in [image folder] will be processed. // For example yolov5s sudo ./yolov5 -s yolov5s.wts yolov5s.engine s sudo ./yolov5 -d yolov5s.engine ../samples // For example Custom model with depth_multiple=0.17, width_multiple=0.25 in yolov5.yaml sudo ./yolov5 -s yolov5_custom.wts yolov5.engine c 0.17 0.25 sudo ./yolov5 -d yolov5.engine ../samples 3. check the images generated, as follows. _zidane.jpg and _bus.jpg 4. optional, load and run the tensorrt model in python // install python-tensorrt, pycuda, etc. // ensure the yolov5s.engine and libmyplugins.so have been built //运行yolov5_trt.py对照片进行检测 python yolov5_trt.py如果环境没问题,最后一步会在build文件夹下面生成一个.engine文件即为序列化之后的文件,使用时候反序列化就ok了。  序列化engine
检测结果:我在2080ti上,使用原始的yolov5对640*640大小的图片进行检测,推理时间大概在20ms左右。下面附上加速之后的效果(用的是fp16),使用fp16加速之后推理一帧的时间在10ms左右,大概加速了一倍。 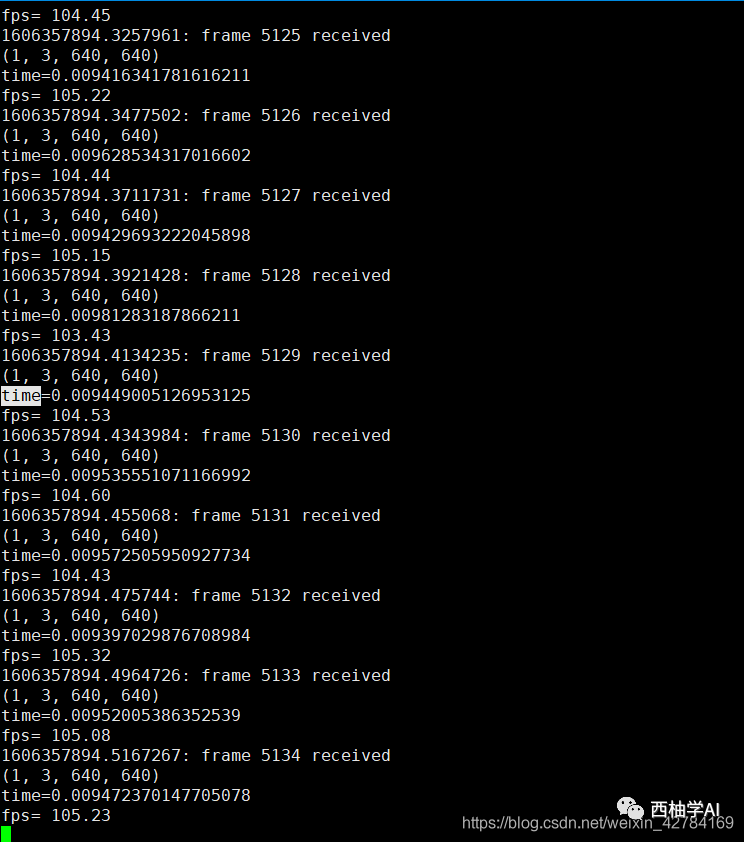 使用fp16推理的fps
注意: 不同型号的gpu,不同数据用来测试结果会有区别。使用不同型号GPU生成的engine文件是不能通用的,比如我在2080ti上面跑出来的engine文件是不能在3080ti上面跑的,想要在3080ti上面跑,必须要重新make。 很多同学想知道单张照片检测出来了,怎么使用这个代码推理视频呢?其实很简单,使用cv2.VideoCapture()就可以从视频中读取一帧一帧的照片,然后对一张张照片进行处理就ok了。 int8量化这里先不讲int8量化的原理,只是介绍这个repo中使用int8来推理加速的步骤,后面会专门写一篇文章来讲int8量化原理。 1.准备校准图像,你可以从你的训练集中随机选择1000s张图像。 2.把图像解压到yolov5/build文件夹下 3.在 yolov5.cpp 中设置了宏 USE_INT8 4.序列化模型并进行测试。 使用int8推理虽然要比fp32和fp16快很多,但是掉点会很严重,在硬件条件充足情况下还是推荐设置为fp32。 Tensorrt各yolo模型对比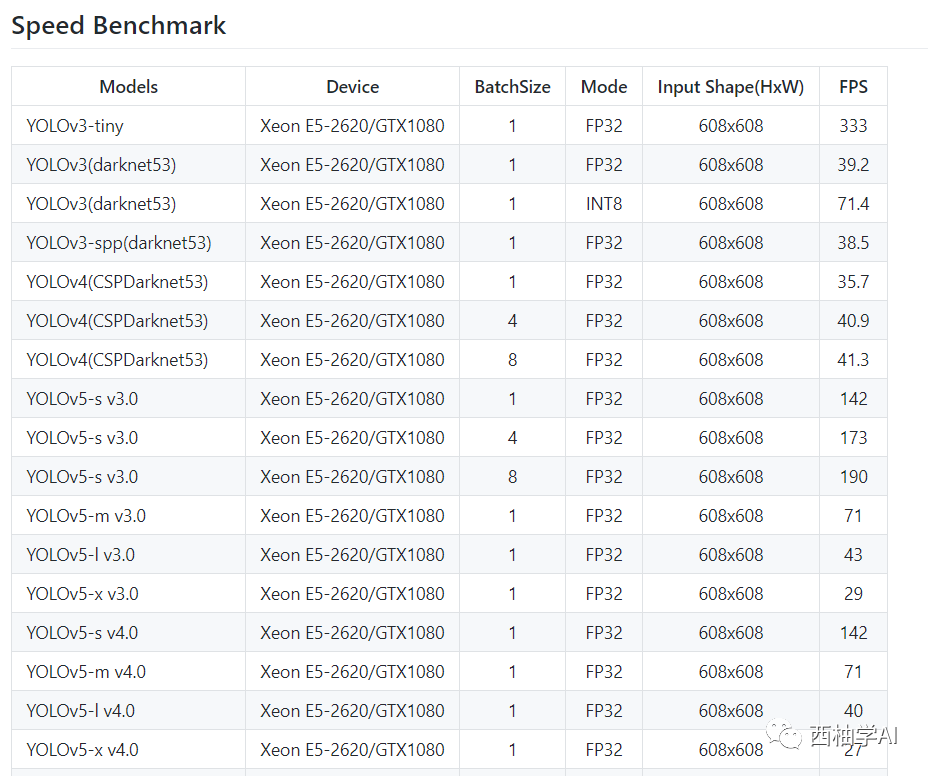 参考:
参考:
1.https://github.com/wang-xinyu/tensorrtx 2.https://github.com/gengyanlei/reflective-clothes-detect 3.https://github.com/search?q=yolov5 4.https://mp.weixin.qq.com/s/7rbEqJNkH-orE1l74qvvtA 本文仅做学术分享,如有侵权,请联系删文。 下载1 在「3D视觉工坊」公众号后台回复:3D视觉,即可下载 3D视觉相关资料干货,涉及相机标定、三维重建、立体视觉、SLAM、深度学习、点云后处理、多视图几何等方向。 下载2 在「3D视觉工坊」公众号后台回复:3D视觉github资源汇总,即可下载包括结构光、标定源码、缺陷检测源码、深度估计与深度补全源码、点云处理相关源码、立体匹配源码、单目、双目3D检测、基于点云的3D检测、6D姿态估计源码汇总等。 下载3 在「3D视觉工坊」公众号后台回复:相机标定,即可下载独家相机标定学习课件与视频网址;后台回复:立体匹配,即可下载独家立体匹配学习课件与视频网址。 重磅!3DCVer-学术论文写作投稿 交流群已成立 扫码添加小助手微信,可申请加入3D视觉工坊-学术论文写作与投稿 微信交流群,旨在交流顶会、顶刊、SCI、EI等写作与投稿事宜。 同时也可申请加入我们的细分方向交流群,目前主要有3D视觉、CV&深度学习、SLAM、三维重建、点云后处理、自动驾驶、多传感器融合、CV入门、三维测量、VR/AR、3D人脸识别、医疗影像、缺陷检测、行人重识别、目标跟踪、视觉产品落地、视觉竞赛、车牌识别、硬件选型、学术交流、求职交流、ORB-SLAM系列源码交流、深度估计等微信群。 一定要备注:研究方向+学校/公司+昵称,例如:”3D视觉 + 上海交大 + 静静“。请按照格式备注,可快速被通过且邀请进群。原创投稿也请联系。
▲长按加微信群或投稿
▲长按关注公众号 3D视觉从入门到精通知识星球:针对3D视觉领域的视频课程(三维重建系列、三维点云系列、结构光系列、手眼标定、相机标定、orb-slam3等视频课程)、知识点汇总、入门进阶学习路线、最新paper分享、疑问解答五个方面进行深耕,更有各类大厂的算法工程人员进行技术指导。与此同时,星球将联合知名企业发布3D视觉相关算法开发岗位以及项目对接信息,打造成集技术与就业为一体的铁杆粉丝聚集区,近2000星球成员为创造更好的AI世界共同进步,知识星球入口: 学习3D视觉核心技术,扫描查看介绍,3天内无条件退款
圈里有高质量教程资料、可答疑解惑、助你高效解决问题 觉得有用,麻烦给个赞和在看~ |


【本文地址】
今日新闻 |
推荐新闻 |